FastAPI - Authentication demo with Passwordless.ID
This minimal example shows an integration between FastAPI and Passwordless.ID.
Source code: https://github.com/passwordless-id/fast-api-demo
Running it
To run it: uvicorn main:app
And open http://localhost:8000/docs
For authentication, you can choose either the implicit flow or the authorization code. For both, the client_id should be your domain ("http://localhost:8000") in our case.
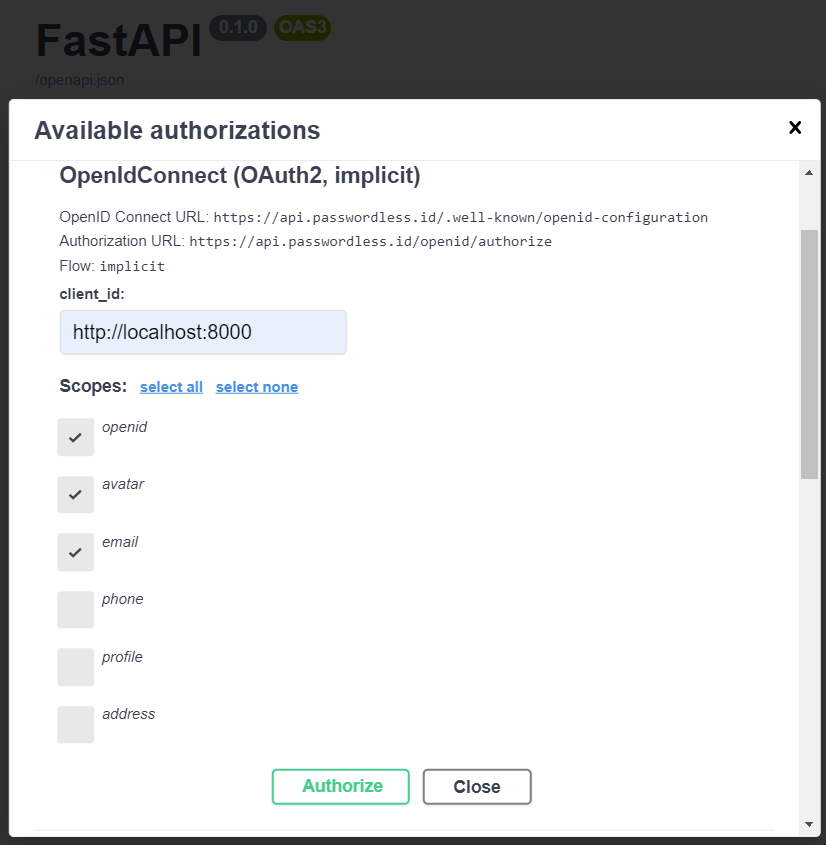
For the authorization code flow, ignore the client_secret and leave it empty. (That sounds fishy right? A section related to security concerns is at the end of this page)
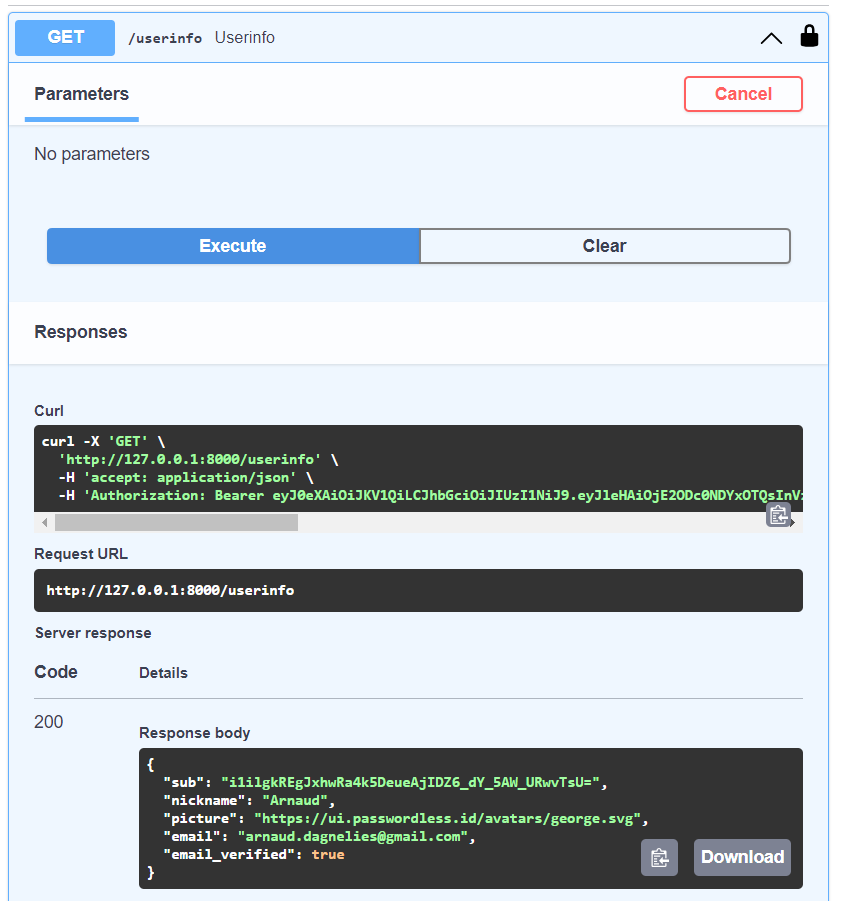
Once you are authenticated and authorized access, you can return the user information server side.
The source code
The whole app is just this handful of lines.
from typing import Annotated

from fastapi import Depends, FastAPI
from fastapi.security import OpenIdConnect
import requests

app = FastAPI()

openid = OpenIdConnect(openIdConnectUrl="https://api.passwordless.id/.well-known/openid-configuration")

@app.get("/userinfo")
async def userinfo(authHeader: Annotated[str, Depends(openid)]):
    res = requests.get('https://api.passwordless.id/openid/userinfo', headers = {"Authorization":authHeader})
    return res.json()
The authHeader contains a short-lived access token that will expire after a short while. It should be used during the sign-in process to fetch the user information (like username or email) and establish a normal user session. This can be done either by setting a session ID cookie and keeping the user information in memory, using a database, using a self-signed JWT or whatever. How exactly this is done is left to your own preference. Lastly, maintaining your own user session avoids uselessly repeating the request and makes the experience more snappy for the user.
Security aspects
Let's understand what is going on in this "authorization code" flow.
The OpenAPI docs page redirects to an URL like
https://api.passwordless.id/openid/authorize?...Once the user authenticates and grants permission to see the profile, the user's browser is redirected back to the OpenAPI docs with a
codeServer-side, python exchanges this
codefor an accesstokenWith the
token, you can send one more request to obtain the user profile
In the third step, where the code is exchanged for the access token, the server usually sends a client_secret too, to prove it's really him. This is to protect against attacks where your code was leaked, to prevent the attacker to get the access token.
For Passwordless.ID, this is mitigated by only allowing redirections back to the client_id requested. That already avoids the code being send somewhere else by an attacker tempering with redirect_uri.
Bottom line is that as long as your front-end is not compromised, the code should not get leaked. It is also a "nonce", which means that once exchanged for a token, it is "consumed" and cannot be used again. Lastly, the token too is rather short lived.
Security-wise, the authorization code flow without secret is still better than the implicit flow. While the first exposes an exchange code in the browser'S URL, the latter exposes the token and user profile directly, which would make stealing it much more convinient if your front-end is compromised.
For even better security, we recommend using the authorization code with PKCE. This is similar to dynamically created secrets. Using and verifying a nonce would also be an option since it is supported by Passwordless.ID. Sadly, neither is widely supported by FastAPI nor OpenAPI.